Imprimir STL Ventilador/Carenagem de Resfriamento com Soprador de 5cm e Sensor para Wanhao D6/Ultimate Modelo 3D - 2235389
Things 3D Fila
Ventilador/Carenagem de Resfriamento com Soprador de 5cm e Sensor para Wanhao D6/Ultimate
Peças para impressoras 3D
Se você ainda não tem uma máquina para imprimir este arquivo pode comprar uma impressora 3d aqui!
Você pode imprimir este modelo 3d com estes filamentos ou com estas resinas 3D.
Sobre o objeto 3D Ventilador/Carenagem de Resfriamento com Soprador de 5cm e Sensor para Wanhao D6/Ultimate
Este é um arquivo desenvolvido e projetado com ferramenta CAD.
Se você ainda não sabe criar seu próprio modelo 3D eu te ensino neste artigo tutorial sobre Tinkercad.
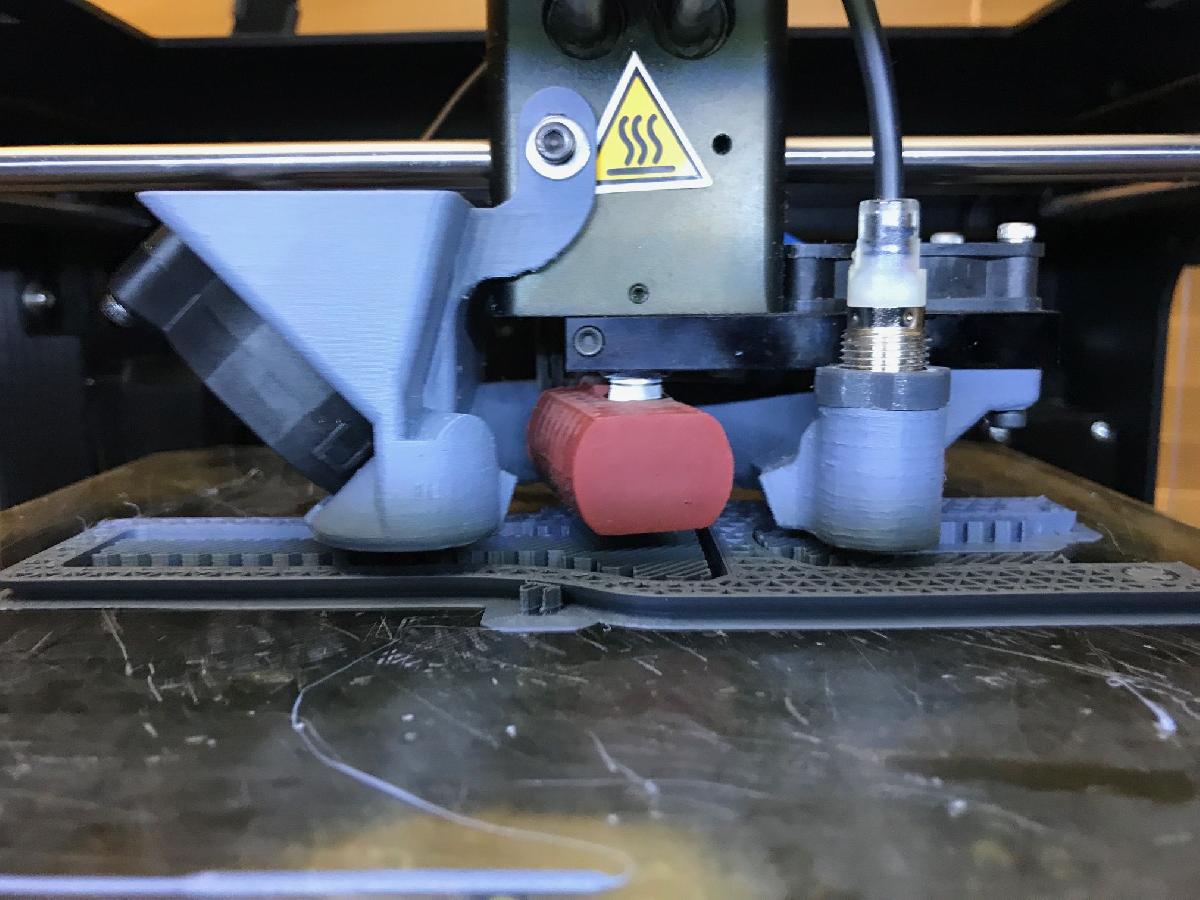
Ventilador/Carenagem de Resfriamento com Soprador de 5cm e Sensor para Wanhao D6/Ultimate foi projetado para Impressora 3D. Finally as much cooling air flow as you want thanks to the EBM-PAPST RLF35-8/14N blower.Version 11 M12 with stronger attachments on the left side.Version 10 M12 has an internal fin to direct more air out of the middle nozzle. This version has three larger nozzles and larger duct volume that extends to the back. To optimize the distance between the nozzles and the heatblock (shown with silicone boot) and air flow to the front turn the heat block as shown by about 25 degree.Thanks to Reflector for exploring the space behind the print head assembly. I was conservative there as I don't want to impede on the print area as I use every mm of it.Version 6 and 7 have 4 nozzles. Version 7 has areas removed that might not be necessary and to expose the cooling block more to airflow. Otherwise it is the same as Version 6. I used the 4 nozzle version for months without issues so this is a safe bet. Version 7 M12 5015 may fit other 5cm blowers. Although you may have to shorten the funnel to get it to fit in the available space on the printer.This is designed to be printed from the bottom up with little support, across the blower entry, the left fixtures and right attachment sites. The nozzles print fine without support with the 4 nozzle version but need support for the three nozzle version, This shroud will not extend beyond the printer dimensions nor limit the print area. You need 3x 20mm M3 (the original screws), 2x 5mm M3, 2x 10mm M3 and one M3 nut. I just tapped the back hole for the M3 screw to fix the EBM-PAPST RLF35-8/14N Blower in place. Also it snaps into the shroud.I use a silicone boot and no heating problems at 250C and 100% fan power. Not sure how that would work out without insulation on the heat block. I printed this in PETG XT 3D Fila 0.150 mm resolution. ABS will be fine as well. If you print with ABS for extra heat resilience the thread for the probe maybe very tight. Screwing the probe in and out repeatedly before installing the shroud will slowly widen the thread. M12x1mm screw in mount for a M12 proximity sensor. Same position as in 1bigpig's probe mount http://www.thingiverse.com/thing:2081168. Install and setup instructions can be found there. Also included is a M12x1mm nut just because the printer can print it perfectly now.The probe is the Omron Manufacturer Part #: E2B-M12KN08-WP-B1 2M which is PNP and it works flawlessly with a 7805 to reduce voltage down to 5V and the PNP Configuration.h of the Marlin duplicator 6 firmware. This probe has a working distance of 8mm in a M12 form factor. That translates into about 4-5mm for aluminium it appears.I first tried with an NPN probe but couldn't get it to work and after checking into this I also don't understand how an NPN could possibly work with a 7805 wired as shown in thing 2081168. But all these induction probes have their own integrated circuits that may make a difference. Make sure you have that circuit schematics if you try something different. Also detection distance of these is given in relation to detecting iron. Al is much less conductive so distance is about half. That is why you want the Omrons with the double distance detection.Screw the probe in so that it is flush with the bottom of the shroud as a starting point. Instead of setting Z offsets I just adjust the probe distance by turning it in the thread. This setup works nicely with a 1mm PEI sheet glued on the build plate. There should be enough space for a 3mm glass plate if anyone uses those.The fan on the cooling block is a EBM PAPST 414F AXIAL FAN, 40MM, 24VDC - no vibrations anymore.Added version 11 without the probe mount.Empiricus@Dremomys
Não deixe de imprimir e compartilhar este modelo 3d. Não deixe sua impressora 3D parada. Mas se você não tem uma impressora 3D ainda, escolha a sua agora.