
Imprimir STL portas e tampa CTC Bizer Dual (e outros) Modelo 3D - 1925351
Things 3D Fila
portas e tampa CTC Bizer Dual (e outros)
Peças para impressoras 3D
Se você ainda não tem uma máquina para imprimir este arquivo pode comprar uma impressora 3d aqui!
Você pode imprimir este modelo 3d com estes filamentos ou com estas resinas 3D.
Sobre o objeto 3D portas e tampa CTC Bizer Dual (e outros)
Este é um arquivo desenvolvido e projetado com ferramenta CAD.
Se você ainda não sabe criar seu próprio modelo 3D eu te ensino neste artigo tutorial sobre Tinkercad.
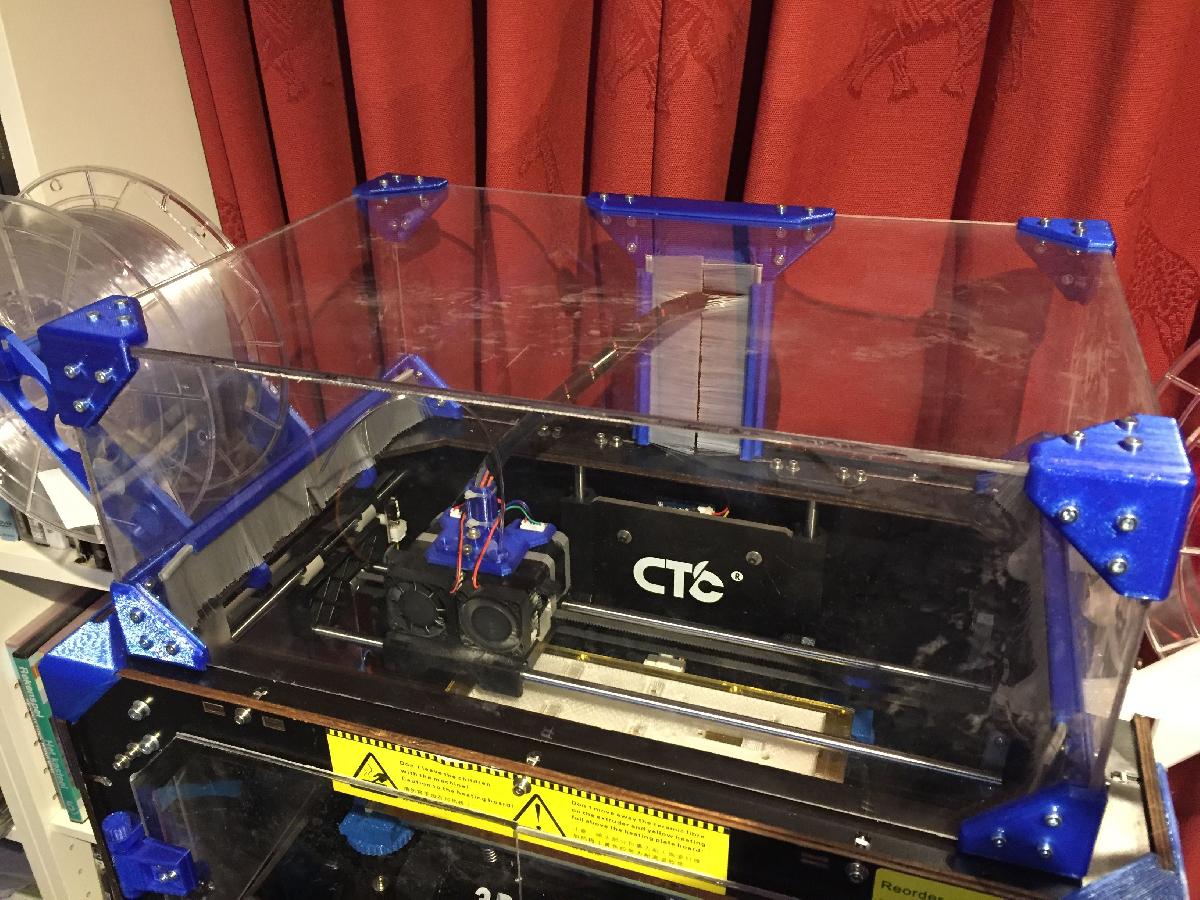
portas e tampa CTC Bizer Dual (e outros) foi projetado para Impressora 3D. This project started with the hinges I found on this platform. From there it progressed in completely closing my CTC with doors and a lid/top-cover. I planned on adding hinges to the lid as well, but decided to keep it separated from the printer so I didn't need to drill more holes close to the y-axis rod and because the lid, when opened, would need to go further to the back than the position of my printer allows. Now I just take it off and put it aside, when necessary.I didn't change the hinges, but did redraw them in Freecad. New stl files are attached.The DXF files are the cutting template for the doors and top-cover plates. The front doors are a bit larger than the front opening, the side doors fit into the side openings. I used 3 mm acrylic which I cut by hand using a special knife. Laser cutting is preferred....Because of the thickness of the acrylic, I added spacers between the hinges and the doors. 6 mm for the side doors and, in the beginning, 3 mm for the front doors. I later changed them for 2mm spacers for a less tight fit.I made drill templates for the printer case and for the doors. They can be mirrored by physically turning them around, so you need just one for each door/side.On the top-cover I used the corner parts as a drill template (Tape it together first to be sure all plates are positioned right)I screwed everything together using M3 nuts and M3 allen bolts (M3x8, M3x10, M3x12 & M3x16). The knobs allow use of round magnets (12 x 2 mm). You can then put some flat (iron) screw is the case that allow the magnets to snap to the case.For the top-cover/lid I used brushes from the local hardware store. These brushes are used in (Deltafix) mailbox weather strips. They're easily cut to size and slide in the brackets. This design is a result of the filament holders I decided to use. It allows the filament, and the extruder cables, to go through and still keep the entire setup closed.All the parts:Doors:8x Hinge, Hingebracket & Pin; 2 for each door4x 2mm spacers; 2 for each front door (3mm spacer for tight fit)4x 6mm spacers; 2 for each side door12x M3x12; Front door hinge12x M3x16; Side door hinge2x Front door knob4x M3x82x Side door knob4x M3x1032x M3 nutTop-cover/lid:Acrylic plates:Top plate 400 x 270 x 3 mmFront plate 400 x 150 x 3 mm(2) Side plates 264 x 150 x 3 mm(2) Back plates 170 x 150 x 3 mm4x Corner inside & Corner outside; for all 4 top corners1x Rear bridge inside & outside; joins 2 rear acrylic plates2x LF (Left Front) + RR (Right Rear) inside & outside corners; bottom corners2x LR (Left Rear) + RF (Right Front) inside & outside corners; bottom corners70x M3x1270x M3 nutOptional:2x L+R Brush holders; Left & Right brush holder1x Rear brush holder: <--
Não deixe de imprimir e compartilhar este modelo 3d. Não deixe sua impressora 3D parada. Mas se você não tem uma impressora 3D ainda, escolha a sua agora.