
Imprimir STL Kossel magnetic z probe mount with zero X Y offset to avoid effector tilt problems/errors. Tested 100%. Modelo 3D - 1198256
Things 3D Fila
Kossel magnetic z probe mount with zero X Y offset to avoid effector tilt problems/errors. Tested 100%.
Peças para impressoras 3D
Se você ainda não tem uma máquina para imprimir este arquivo pode comprar uma impressora 3d aqui!
Você pode imprimir este modelo 3d com estes filamentos ou com estas resinas 3D.
Sobre o objeto 3D Kossel magnetic z probe mount with zero X Y offset to avoid effector tilt problems/errors. Tested 100%.
Este é um arquivo desenvolvido e projetado com ferramenta CAD.
Se você ainda não sabe criar seu próprio modelo 3D eu te ensino neste artigo tutorial sobre Tinkercad.
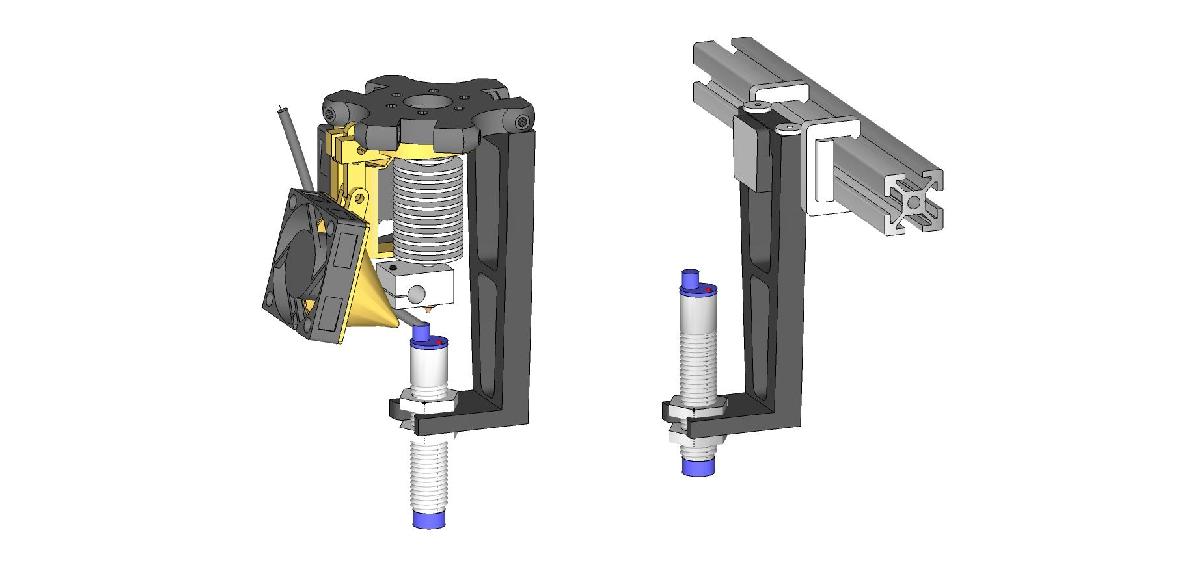
Kossel magnetic z probe mount with zero X Y offset to avoid effector tilt problems/errors. Tested 100%. foi projetado para Impressora 3D. After first disappointing experience with inductive z-probe that was originally (FolgerTech Kossel rev.B) mounted with high X-Y offset from the extruder tip, I decided to dismount it and made another E3D mount for additional filament cooler (check my another things).But recently I decided to give it another try and designed magnetic mount that holds the z-probe (inductive sensor LJ12A3-4) right under the tip, eliminating offset/tilting errors. I must say that now it works like a charm! Using David's online calibrator (user dc42) it took only 10 minutes to level the bed.You will need six 9-10mm neodymium disk magnets (something like these http://www.homedepot.com/p/MASTER-MAGNETICS-3-8-in-Neodymium-Rare-Earth-Magnet-Discs-12-per-Pack-07090HD/202526371) and epoxy (I used 5-min epoxy) or crazy glue.Tip: the power of magnets depends how they aligned to each other. Even 0.3 mm misalignment reduces the power significantly. So, the best way to glue them - to glue two magnets to the printed mount first. Then glue one magnet to the bottom of effector using couple of magnets on the top of effector to hold the bottom one in place (pay attention to magnet poles to make sure they will stick). Then stick the fourth magnet to the glued magnet on the mount, add a drop of glue on the top and put everything in place to cure (see picture). Add some magnets to the top of effector to increase the force and let it cure. Use piece of waxed or parchment paper between magnets to guarantee that they will not glue to each other.Don't forget to adjust your z-probe height in firmware.Set Z max height for X0 Y0 Z0 using paper test. Save to Eeprom.Home the printer using G28.Attach the probe and carefully move it down using manual control in Repetier Host or Pronterface until it triggers.Read your Z value - this is your probe height. Save it to Eeprom (in Repetier it's Z-probe height field in Eeprom configuration window).To organize the probe, when not in use - there is a screw-less mount that clicks right to the 2020 extrusion. The clips are very tight, it should be like this. Just push them hard and they will lock the hook securely.PS: to use inductive probe with glass bed - just print this adapter http://www.thingiverse.com/thing:1195525.How it works: https://www.youtube.com/watch?v=83hY3M8QLtg
Não deixe de imprimir e compartilhar este modelo 3d. Não deixe sua impressora 3D parada. Mas se você não tem uma impressora 3D ainda, escolha a sua agora.