

Imprimir STL Cruzar de Nivel (Reto) para Trilhos Tubulares O Gauge V2 Modelo 3D - 3193426
Things 3D Fila
Cruzar de Nivel (Reto) para Trilhos Tubulares O Gauge V2
Edifícios e Estruturas
Se você ainda não tem uma máquina para imprimir este arquivo pode comprar uma impressora 3d aqui!
Você pode imprimir este modelo 3d com estes filamentos ou com estas resinas 3D.
Sobre o objeto 3D Cruzar de Nivel (Reto) para Trilhos Tubulares O Gauge V2
Este é um arquivo desenvolvido e projetado com ferramenta CAD.
Se você ainda não sabe criar seu próprio modelo 3D eu te ensino neste artigo tutorial sobre Tinkercad.
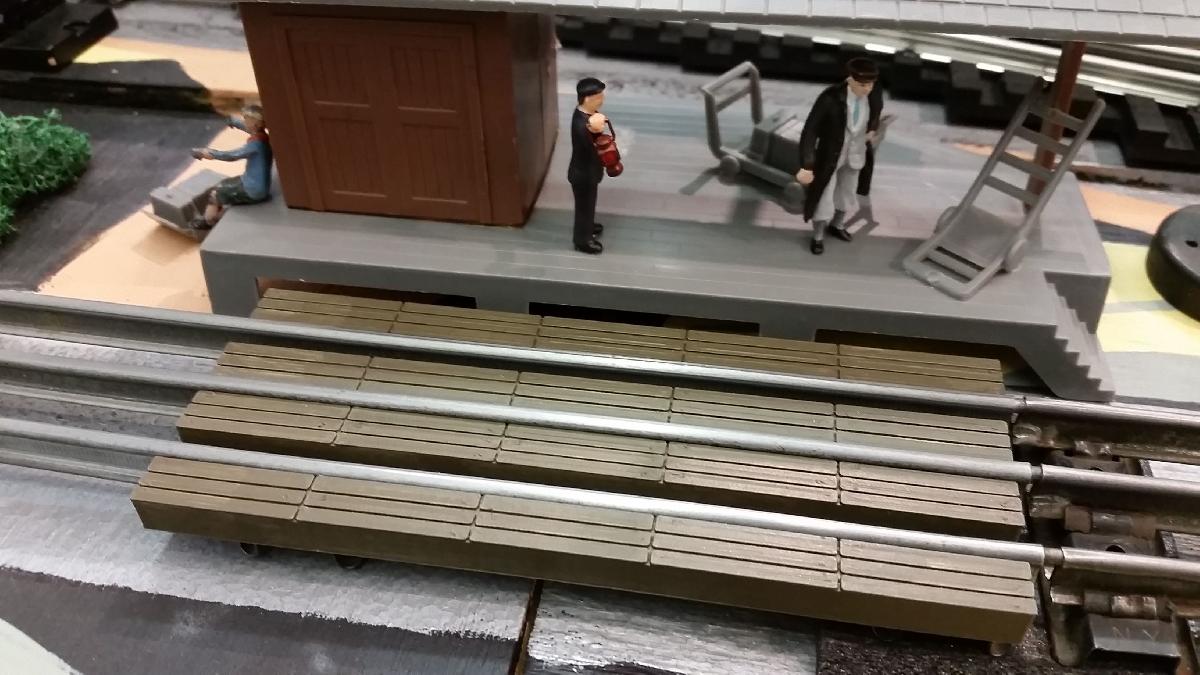
Cruzar de Nivel (Reto) para Trilhos Tubulares O Gauge V2 foi projetado para Impressora 3D. This thing is a wooden grade crossing designed for O gauge tubular track. The design consists of two OpenSCAD programs, one makes a crossing for straight track and the other makes a crossing for O-31, O-42, O-54 and O-72 curved track.This thing is the straight crossing, for the curved version look here https://www.thingiverse.com/thing:2832224The top of each piece represents wooden boards that are bolted together to make the crossing. Each crossing consists of four pieces. The two center pieces go along sidethe center rail and the other two go on the outside of the outer rails. The curved crossing pieces are accurately curved to match the actual track. If you look in the OpenSCAD program, you can see what values I used for the diameters of the four different curves supported. I used the RR-Track program to measure the center rail to center rail diameter of a loop. This seemed to work pretty well as the finished curved crossing pieces can be glued directly to the center rail and to the outer rails.Each piece of the crossing has a diagonal side to clear the ties and the center rail insulator.The difficult dimension in this project was the 'space' left on the inside edges of the outer rails for the wheel flanges. I measured a bunch of track and there is about 0.55 inches between the inside edges of the rails. I ended up making the gap about 0.15 inches - which made the crossing pieces 0.4 inches wide. This seems to work on my layout with my mostly MTH rolling stock. You might need to make this dimension smaller to have a larger flange gap.The grade crossing pieces should fall about 0.07 inches below the tops of the tubular rail.In the OpenSCAD program, you select the length of the crossing. I found that 4.5 inches works well for rural (1 lane) roads and 6.0 inches works for town (2 lane) roads.Even with the diagonal side, you should be able to print this thing without using support.With V2 of the grade crossing, you can optionally print ramps that go up to the crossing. This makes the integration with scenery a little easier in some cases.You can print either the grade crossing or the ramp. So if you want both, you have to create two stl files.
Não deixe de imprimir e compartilhar este modelo 3d. Não deixe sua impressora 3D parada. Mas se você não tem uma impressora 3D ainda, escolha a sua agora.