
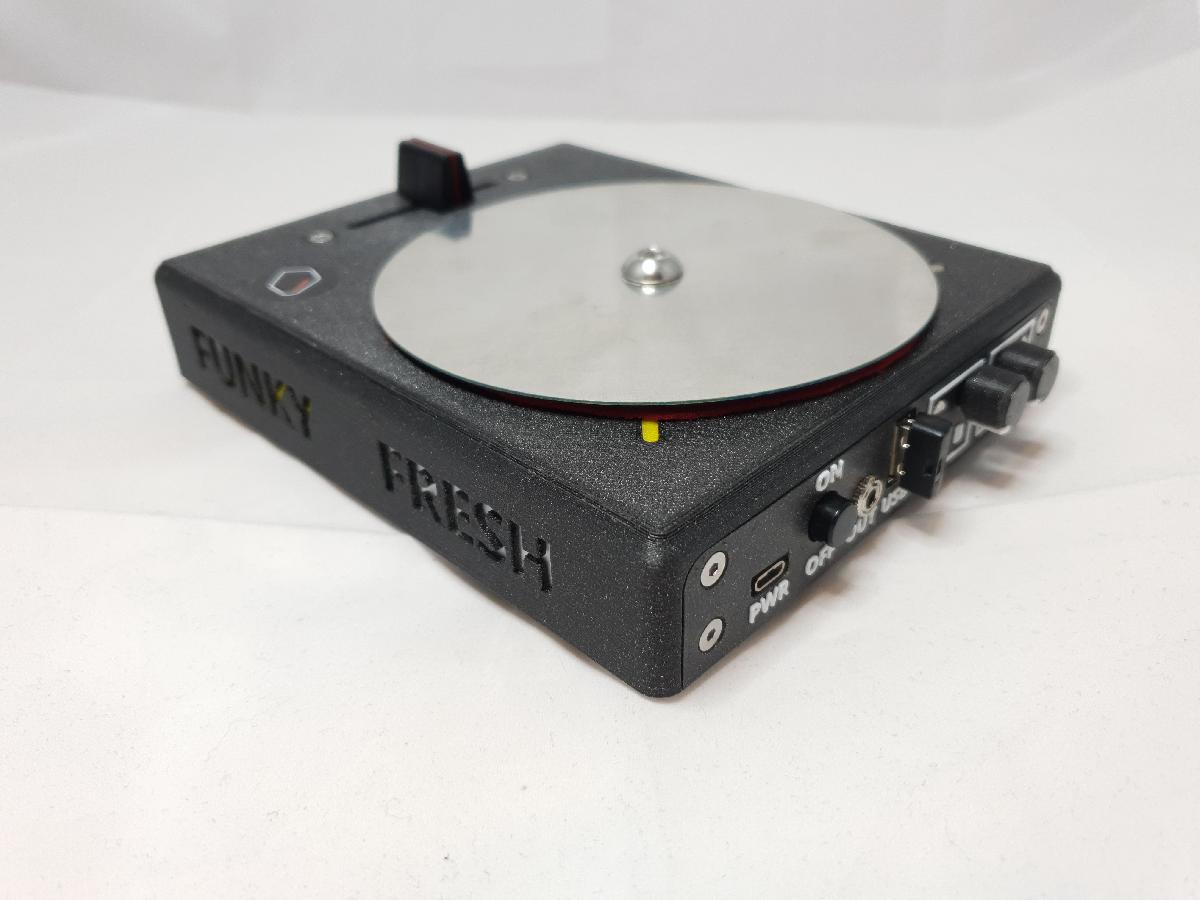
Imprimir STL Controlador Digital de Raspagem Rasteri SC1000 Modelo 3D - 3283470
Things 3D Fila
Controlador Digital de Raspagem Rasteri SC1000
Música
Se você ainda não tem uma máquina para imprimir este arquivo pode comprar uma impressora 3d aqui!
Você pode imprimir este modelo 3d com estes filamentos ou com estas resinas 3D.
Sobre o objeto 3D Controlador Digital de Raspagem Rasteri SC1000
Este é um arquivo desenvolvido e projetado com ferramenta CAD.
Se você ainda não sabe criar seu próprio modelo 3D eu te ensino neste artigo tutorial sobre Tinkercad.
Controlador Digital de Raspagem Rasteri SC1000 foi projetado para Impressora 3D. This is 3D-printable parts of the enclosure of the SC1000 by Rasteri. The SC1000 is an open source digital scratch controller. 3D-files and renderings made by me. I recommend not to order these files from a service or go through too much trouble or money to have these made. The side text panels require print stops and change of filament in order of the text details to match the case - not sure if printing services can do this for you. If you have a desktop printer, then go ahead!Rasteri SC1000 Github page with BOM and instructions:https://github.com/rasteri/SC1000The goal of these files is to make a refined solution to Rasteris prototype. I have made a mount for the bearing, and screw holes for the Innofader Mini Plus. I am also thinking of modeling a better jog wheel. This is a work in progress, and it will get better and better!Please note that the jog wheel need to be conductive in order to get the capacitive touch to work. UPDATES (dd.mm.yy):15.12.18: Added top plate, adjusted screw holes on "aluminium" bar.16.12.18: Added bottom plate with slots for rubber feet (12.7x12.7x5.8mm found here: https://www.ebay.com/itm/401510551963).17.12.18: Added top plate without raised platter.18.12.18: Fixed awkward error of forgetting to add screw holes to the bottom of the "aluminium" bar.19.12.18: Reuploaded all files with adjustments. Added support column to top plate with matching screw holes on bottom plate. Deepened screw holes on aluminium bars for better result when tapping. 21.09.19: COMPLETLY re-designed the case and uploaded new files. 29.09.19: Added model file of the top case without the text on the sides for fast and easy printing.DIMENSIONS ON THESE FILES MAY BE OFFList of fasteners and accessoriesThreaded inserts:-The case uses 11x M3x6mm inserts-The bearing holder uses 4x M3x3mm insertsBolts:-15x M3x5mm countersunk hex flat head screws-6x M3x14mm countersunk hex flat head screws-2x M3x6mm countersunk hex flat head screws (for the Innofader)Nuts:-6x M3 nutsRubber feet:-Self adhesive rubber feet 12.7mm x 12,7mm x 5.8mm (eBay)Stand offs:-M3 brass hex female 5mmInstructionsPrint the case and all the parts. Clean the prints, and then glue the text inserts. When printing the text inserts (BEEP, AHHH, FUNKY, FRESH, SC1000) you need to pause the prints and change filament in order to print the details of the text in the same color as the case. In PrusaSlicer you can add pauses. When the printer stops, you simply change the filament to the same color as the case. -Pause the print at layer height 18 -1.05mm for the side panels and "SC1000".-Pause the print at layer height 38 - 2.05mm for the back plate.
Não deixe de imprimir e compartilhar este modelo 3d. Não deixe sua impressora 3D parada. Mas se você não tem uma impressora 3D ainda, escolha a sua agora.