Imprimir STL Como ter um bom comeco ao usar uma sonda de bico Z. Modelo 3D - 2685962
Things 3D Fila
Como ter um bom comeco ao usar uma sonda de bico Z.
Peças para impressoras 3D
Se você ainda não tem uma máquina para imprimir este arquivo pode comprar uma impressora 3d aqui!
Você pode imprimir este modelo 3d com estes filamentos ou com estas resinas 3D.
Sobre o objeto 3D Como ter um bom comeco ao usar uma sonda de bico Z.
Este é um arquivo desenvolvido e projetado com ferramenta CAD.
Se você ainda não sabe criar seu próprio modelo 3D eu te ensino neste artigo tutorial sobre Tinkercad.
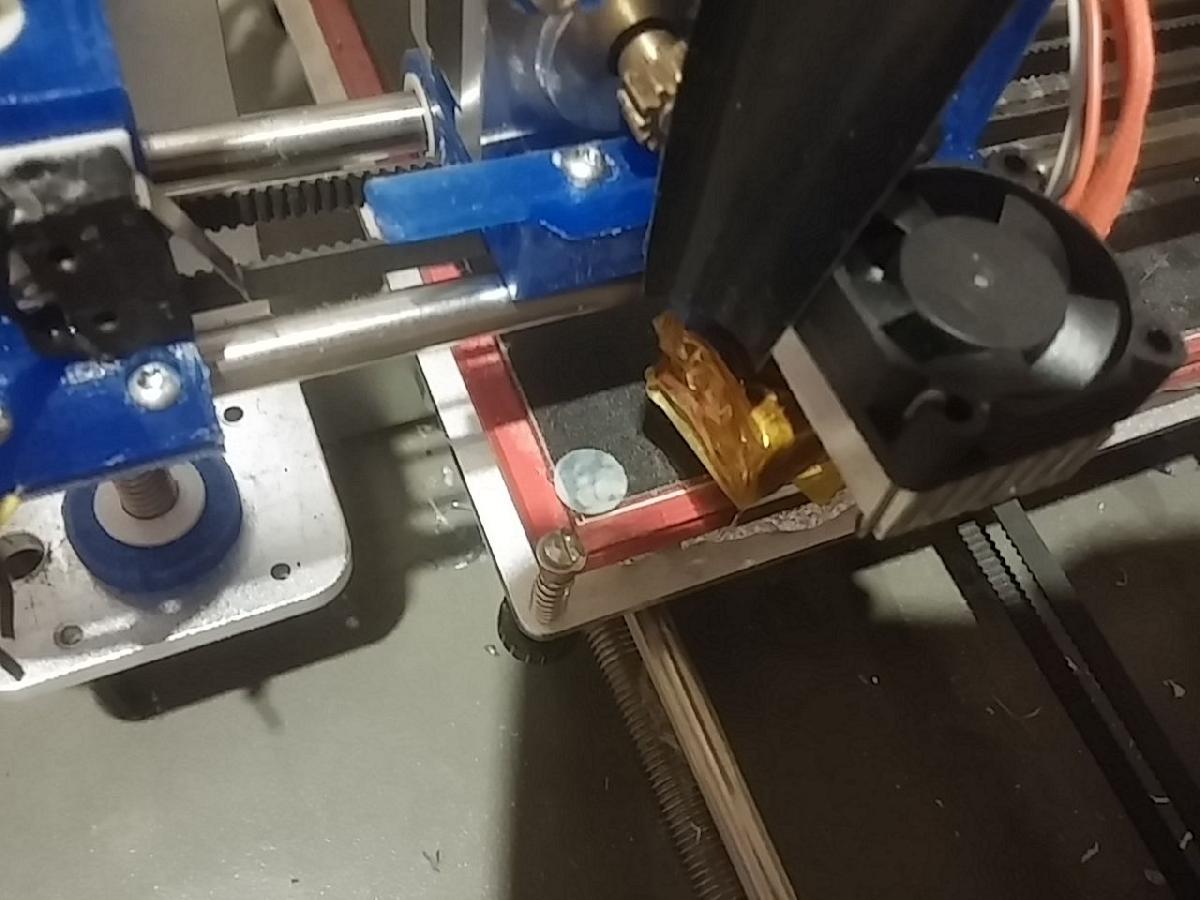
Como ter um bom comeco ao usar uma sonda de bico Z. foi projetado para Impressora 3D. Even with a well made machine not requiring auto bed level, from time to time, you have to adjust the Z end stop. For ex. when you change the extruder, remove the plate etc...So I got rid of the Z regular home switch and made one triggered by the nozzle contacting the bed to do the job. Forget about bulky, heavy, clumsy solutions like proximity sensors, BLTouch, ridiculous microswith mounted on a servo ...They all need adjustment anyway, therefore defeating the purpose and often are unreliable.To use the nozzle as a probe, various ready solutions exist: piezo, strain gauge, vibration sensor, mechanical switch ...Do your search and pick the one you want that can be best integrated in your hot end/carriage or design your own as I did (sorry I don't intend to publish it here) :)Caveat: The nozzle must be clean and the bed place it will hit must be free from hole, filament blobs ...I don't like the idea of scraping the nozzle, it can easily be damaged. PETG XT 3D Fila is pretty sticky, so good luck.When the bed is covered with a sheet of BuildTack or similar, the home position is usually a hole after the blobs of melted plastic have been scraped or damaged by the hot nozzle.Yet, the solution is simple. Just a small piece of PTFE sheet or thin Al cut from an old shade at the home position. Use ahesive that can stand the bed T° or you can as I did, cut a portion of the BuildTack while keeping its excellent adhesive on the bed. Now you have to follow a simple procedure that can be done manually of via a G code script to be run at print start and finish (Some set up can also be made in your firmware config, for ex the homing order which is important). You may have to set a Z offset to get the right Z0 due to the slight difference in height.Lift Z a few mm, bring the nozzle and the bed up to working T° then home, X Y then Z..You can home Z a second time to make sure the melted filament that may have oozed is expelled.Note, my sensor needs about 1N. If adjusted too light, there may be issues. Insure you sensor is not too sensitive (if it is, you will get trouble with vibration anyway ! )When the job is done, remove the print, clean the nozlle and home while the nozzle is still hot. The nozzle resting at home will prevent oozing and you will start clean the next print.The PTFE sheet or Al shim will not damage the nozzle and any blob will be easy to remove. Note the PTFE can be reinforced by a thin smaller metal sheet (0.1) underneath.I have used both PTFE and Al with the same success.With a 0.1 mm sheet you will get the right distance to bed. Adjust the Z offset eventually, especially if you use a thicker sheet (which in fact will be stronger and last longer).If required cut a portion of the BuildTack leaving just the strong adhesive and stick the PTFE piece.As you can see, the nozzle face is flush despite no preliminary cleaning had been done and there was melted PETG XT 3D Fila sticking to it.Time I install a silicone shroud :PS: I have used this for months now, and if your machine is properly build, no adjustment neede anymore.Don't believe the idiots commenting below, check what they publish and have a good laugh !The stl is there just because Thingiverse requires one.
Não deixe de imprimir e compartilhar este modelo 3d. Não deixe sua impressora 3D parada. Mas se você não tem uma impressora 3D ainda, escolha a sua agora.