
Imprimir STL Caixa para MKS 1.4 Ramps Upgrade ANET A8 com Pi 3 Modelo 3D - 2855076
Things 3D Fila
Caixa para MKS 1.4 Ramps Upgrade ANET A8 com Pi 3
Peças para impressoras 3D
Se você ainda não tem uma máquina para imprimir este arquivo pode comprar uma impressora 3d aqui!
Você pode imprimir este modelo 3d com estes filamentos ou com estas resinas 3D.
Sobre o objeto 3D Caixa para MKS 1.4 Ramps Upgrade ANET A8 com Pi 3
Este é um arquivo desenvolvido e projetado com ferramenta CAD.
Se você ainda não sabe criar seu próprio modelo 3D eu te ensino neste artigo tutorial sobre Tinkercad.
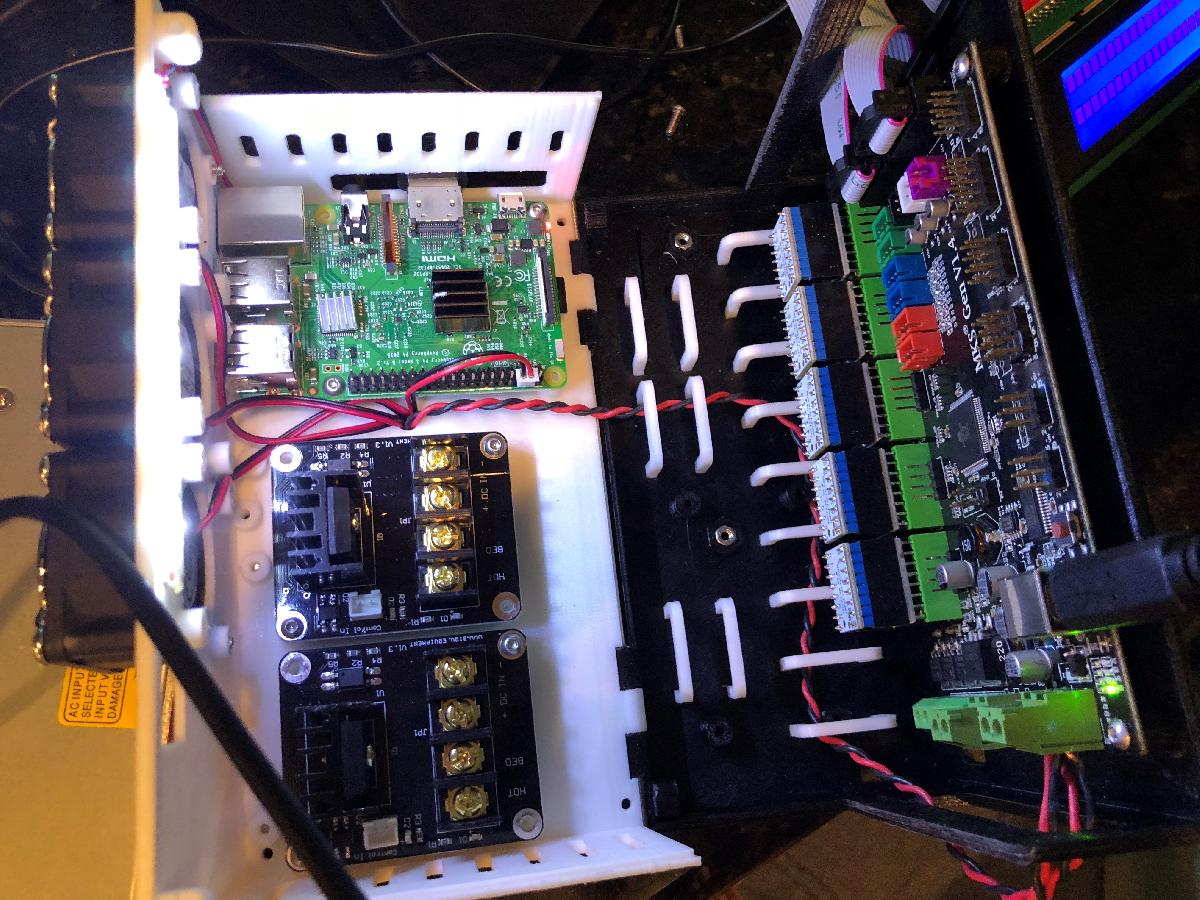
Caixa para MKS 1.4 Ramps Upgrade ANET A8 com Pi 3 foi projetado para Impressora 3D. I am currently working on a major project to fully upgrade my Anet A8 to the MKS RAMPS 1.4 Board and all the other fanciness I can do with it.This box has not been printed yet, so i am not sure everything is perfect, there are a few things such as the clips, hinges, and light bar that all seem too work on paper. But may not work in real life.Features:-Mounting position for the MKS Ramps 1.4 main board-Various access holes for related wires-Plenty of room for the stepper drivers, including smoother boards when used between the stepper driver and the main board-Removable cable management clips along the back to help keep things tidy. There are 9 positions available. 4 overlap the buck-boost and cannot be used together.-3x 40mm fans located directly over the stepper drivers-2 x Positions for hotbed/hotend mosfets-1x Position for DC-DC buck converter (Yeeco XY-014: http://a.co/3vdBNvL) (I will probably use this for illumination things) PS. do not use this buck for 24 to 12vdc AND USB power for the Pi 3 at the same time. smoke will happen-1x Mounting position for a Raspberry Pi 3.-1x Ribbon cable pass though for Pi 3 Camera.-Side Panel is hinged to allow easy access to the all inside boards without disconnecting the Pi or mosfets. This will use a 3mm peg.-Case edge ridges to help with cover alignments and add rigidity when closed-1x Light bar at cable management. I am not sure if i will use this or not, but i wanted to make the mounting position and parts into the box in the off chance that I use it.--My hopes were that this would support some LED strip tape as well as support some of the 'mid board' cables like thermometers, and end stop switch wires.-All screw/mounting holes are made small so that they can be pre-drilled to size. This should make it easy to use different hardware and also maintain "thread-bite"04-27-18 Update: Started the print on this. Made some tweaks that have not been posted yet. This includes some clearance in the hinge (fillet). As well as adding supports for 125mm and 135mm board lengths. Not sure if 125 will be useful for some, but left it there. These can be cut off for those that need 135. I might toss 125 if it becomes troublesome. will update with the make and progress if changes are made.04-30-18 Update: Successfully Printed the Main box and side cover. Holes lined up for the main cover properly. I will likely remove the 125mm holes as I do not think there is a 125mm MKS GEN version. The side cover is a bit tricky to print as there are hinges. I chose to print the hinges down and use a raft. Currently printing the top and clips.05-09-18 Update: Major update. I printed out the first version and learned a lot of things. top cover didn't quite fit. Mostly due to the shrinking plastic.--I removed the parts that catch so this shouldn't matter. There are still some warp issuesthat are unavoidable. these should be handled by the screw points that hold the covershells together.--I added lots more cable management.--Added a side cover to support two buck converters with easy access to the displaysand buttons. my thought here is that one could provide a step down from 24v to 5v forthe pi, the other could provide a step down from 24v to 12v for lights and cooling fans.----added a standoff file if these buck converter are used.----if they are not used, the holes are there for future upgrades, but will be smooth withno standoffs hanging off the side.----Added wire pass through for this area into the case.----Left the inside posts in case this is desired by someone.--I removed the 125mm holes as I figure these are mistakes and will not be a real thing.--I reinforced the hinges on both parts. (I did not intend these to be a heavy-duty hinge.these will likely break off after 15-20 openings if you are not careful.)--I combined the top cover and door into one part which made everything much simpler.--opened the fan holes up 3mm more due to a bad measurement.--Added 2 clip versions. v1 is oversized (0.5mm) long wise to give extra clip force. v2 is right sized.05-31-18 Update: Added Pictures
Não deixe de imprimir e compartilhar este modelo 3d. Não deixe sua impressora 3D parada. Mas se você não tem uma impressora 3D ainda, escolha a sua agora.